

If you plan on taking a lot of different mushroom spore prints a great tip is to laminate the black and white paper together, and once you’re finished with your spore print you can wipe the laminated papers clean and use it again).
Mushroom Spore Prints can be the key feature that identifies one species of mushroom from another, in this guide on how to make mushroom spore prints we will be going through the steps we take in taking spore prints.
Have you ever wondered how mushrooms reproduce and spread? It’s all thanks to their tiny, magical reproductive cells called spores. Just like seeds for plants, spores are the life force behind mushrooms. They carry the genetic material necessary for creating new mushrooms and come in a wide range of colors, shapes, and sizes.
Making a spore print is not only a practical way to identify mushrooms, but it’s also a fun and educational activity for people of all ages. In this article, we’ll take a deep dive into the world of mushroom spore prints. We’ll explore what spores are, why they’re important, and how to make your very own spore print step by step. So put on your foraging hat and let’s dive in!
The Magic of Mushroom Spores
Understanding Spores and Mushroom Reproduction
Before we delve into the art of making spore prints, let’s take a moment to understand what spores are and their role in mushroom reproduction. Spores are the reproductive cells of fungi, including mushrooms. They perform the same function as seeds do for plants – they are the key to creating new life.
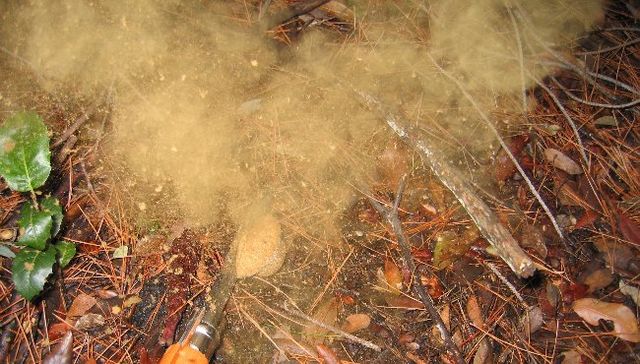
Each mushroom carries and releases millions of spores, which contain the genetic material needed to form new mushrooms. These spores are released into the environment and can be carried by wind, water, insects, or animals to new locations. Depending on the Mushroom, once in a suitable environment, the spores germinate and give rise to mycelium, the vegetative part of the fungus. Each spore is a single cell that is capable of sending out a hypha that will develop into a group and form its own mycelium. If the hypha of one spore meets up with the hypha of another, it begins the sexual process of spore production through special spore-producing cells. The mycelium then develops into a fruiting body, which we commonly refer to as a mushroom.
This is its own, quite big, subject and you can read up more about it here
The Diversity of Spore Colors
One fascinating aspect of mushroom spores is their wide range of colors. Spore color can vary from white to yellow, cream, green, brown, red, purple, rust, and even black. The color of the spores is determined by the pigments present in the spore-bearing structures, such as gills, pores, spines, or tubes, which are found on the underside of a mushroom’s cap.
The spore color can be a valuable clue in mushroom identification. Different mushroom families have distinct spore colors, making them a useful tool for narrowing down the possibilities when trying to identify a mushroom. However, it’s important to note that spore color alone should not be the sole factor in identification, especially when it comes to edible mushrooms. Consulting an expert or using a comprehensive field guide is always recommended.
The spore flow chart in our mushroom foraging book uses spore colour as one of the key initial questions in helping to correctly identify mushroom families.
The Purpose of Making Mushroom Spore Prints
Mushroom Identification
One of the primary reasons for making mushroom spore prints is to aid in mushroom identification. By examining the color of the mushroom spore print, you can determine which mycological family a mushroom belongs to. This information is crucial for distinguishing between different species and understanding their characteristics.
However, it’s important to remember that spore color is just one piece of the identification puzzle. Other features, such as the shape, size, and texture of the mushroom, as well as its habitat and odor, should also be taken into consideration. If you’re unsure about the edibility of a mushroom, never rely solely on spore color for identification. Always consult an expert before consuming any wild mushroom.
Mushroom Cultivation
Mushroom spore prints can also be used in mushroom cultivation. While it may not be the most reliable method for reproducing specific strains, growing mushrooms from spores can be a fun and experimental process. Each spore represents a potential new mushroom strain with unique characteristics. It’s like embarking on a thrilling journey of discovery, not knowing what surprises await you.
However, it’s important to note that growing mushrooms from spores can be unpredictable. The resulting strains may vary in terms of growth speed, fruiting body size, color, and other characteristics. For commercial purposes, it’s generally recommended to start with proven strains created through cloning existing popular mushroom strains. But for those who enjoy experimentation and the excitement of the unknown, growing mushrooms from spores is an adventure worth undertaking.
Mushroom Spore Print Art
Aside from their practical uses, spore prints also have aesthetic value. Each mushroom spore print is unique and can be transformed into a beautiful piece of art. Artists around the world have embraced the beauty of spore prints, using them as inspiration for their creations.
Spore print art allows you to explore the patterns, colors, and textures of different mushrooms. By combining spore prints from various species, you can create captivating and visually striking compositions. Artists experiment with different papers, surfaces, and even incorporate additional elements to enhance their creations. It’s a delightful way to appreciate the intricate beauty of mushrooms without handling the actual fungi.

How to Make Your Own Mushroom Spore Print
Now that we’ve covered the fascinating world of mushroom spores and their significance, let’s dive into the step-by-step process of making a spore print. It’s a simple and rewarding activity that anyone can enjoy.
Step 1: Selecting the Perfect Mushroom
The first step in making a spore print is choosing a mushroom with well-developed spore-bearing structures. Look for mature mushrooms that have fully opened caps and exposed gills, pores, or spines. The spores are typically found on the undersides of the caps, so it’s essential to select a mushroom that allows easy access to this area.
When foraging for mushrooms, always ensure that you have the necessary permissions and follow local regulations. It’s important to respect private property and protected areas. If you’re unsure about the edibility or safety of a mushroom, it’s best to leave it be or consult an expert.
Step 2: Removing the Stem
Once you’ve selected a suitable mushroom, gently remove the stem from the cap. This can be done by snapping it off or using a sharp knife or scissors. Be careful not to damage the spore-bearing surface on the underside of the cap.
If you’re planning to use the spore print for cultivation purposes, it’s crucial to maintain a sterile environment. Clean your workspace, hands, and any tools you’ll be using with isopropyl alcohol or a disinfectant to minimize the risk of contamination.
Step 3: Preparing the Spore Print Surface
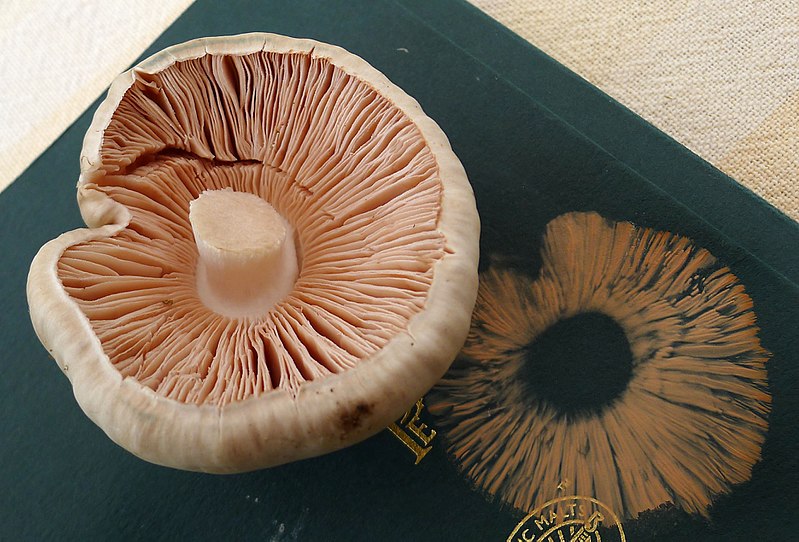
To create a spore print, you’ll need a suitable surface for the spores to fall onto. White and black paper are commonly used for this purpose – you would make sure half of the mushroom sites over the white paper and the other half sits over the black paper. White paper works well for mushrooms with non-white spore prints, while black paper is ideal for capturing white or light-colored spores. Alternatively, you can use glass, foil, or other flat surfaces.
If you plan on taking a lot of different spore prints a great tip is to laminate the black and white paper together, and once you’re finished with your spore print you can wipe the laminated papers clean and use it again.
Place the mushroom cap with the spore-bearing surface facing down onto the chosen surface. Make sure the cap is centered and in full contact with the surface to ensure a clear and accurate print.
Step 4: Enclosing the Mushroom
To prevent the spores from being dispersed by air currents, cover the mushroom with a glass, bowl, or other suitable container. This enclosure will create a controlled environment for the spores to fall onto the surface without interference.
Leaving the mushroom covered for a few hours or overnight will allow ample time for the spores to drop and form a distinct print. The exact duration may vary depending on the freshness of the mushroom and the humidity of the environment. It’s best to check periodically to ensure the spore print has fully developed.
A Top tip is to make sure you don’t leave the mushroom more than 24 hours as older specimens may drop larvae or even start to rot on the paper – it sounds obvious but this has caught me out on numerous occasions, to the disgust of my wife.
Step 5: Revealing the Spore Print
After the designated time has elapsed, carefully remove the container and lift the mushroom cap to reveal the spore print. Take caution not to smudge or disturb the delicate spores.
Observe the intricate patterns and colors that have formed on the surface. Each spore print is a unique work of art, representing the characteristics of the mushroom species. Take a moment to appreciate the beauty and diversity of the fungal kingdom.
Preserving and Storing Mushroom Spore Prints
Once you’ve created your mushroom spore print, you may want to preserve it or store it for future reference. Here are a few tips to help you keep your spore prints in optimal condition:
- Fixative or Hairspray: To preserve the mushroom spore print, you can lightly spray it with an artist’s fixative or hairspray. This will help protect the spores and prevent smudging. Hold the spray can at least 12 to 15 inches away from the print to ensure an even application.
- Lamination: If you want to preserve the spore print for a long time, consider laminating it. This will provide a protective layer and ensure the print remains intact.
- Storage: Store your spore prints in a cool, dry place to prevent moisture damage. You can place them in a folder or envelope labeled with the mushroom species and the date of the print.
Exploring the World of Mushroom Spore Prints
Now that you’ve mastered the art of making spore prints, you can embark on a journey of exploration and discovery. Dive into the fascinating world of mushrooms, with their diverse spore colors, shapes, and patterns. Use your newfound knowledge to aid in identification, cultivate unique mushroom strains, or create stunning mushroom spore print art.
Remember, mushroom foraging should always be done responsibly and with respect for the environment.
If you plan to eat the mushroom and you’re unsure about the edibility or safety of a mushroom, seek guidance from experts or local mycological societies.
With each mushroom spore print you create, you’ll deepen your understanding of the fungal kingdom and gain a deeper appreciation for nature’s intricate wonders.
So, grab your basket or paper bag, head out into the wilderness, and let the magic of mushroom spore prints unfold before your eyes.
Happy foraging and printing!