

Wild Weaving: Craft a Great Foraging Basket with Ivy
Embrace the art of “wild weaving” and transform foraged ivy vines into a beautiful and functional basket! Perfect for gathering nature’s bounty, this all-natural craft is a rewarding and sustainable way to connect with the natural world. Whether you’re a seasoned basket weaver or a curious beginner, this guide will equip you with the knowledge and techniques to create your own unique wild woven basket. So, grab your secateurs, step outside, and get ready to weave!
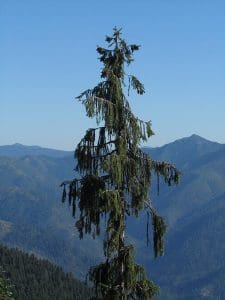
In many communities around the world it is common practice to weave using wild materials. For example indigenous Haida basket makers weave baskets from spruce roots. Their weaves are so tight they can even weave cups which hold liquid!
Indonesian Ketuput makers weave containers from coconut palm fronds to steam risC, often for religious festivals and celebrations.


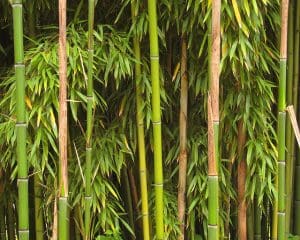
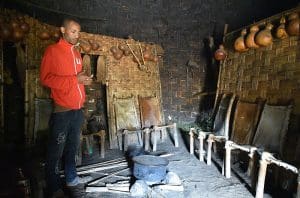
Dorze People from Ethiopia weave huts from split and woven bamboo and thatch them using local banana palms.

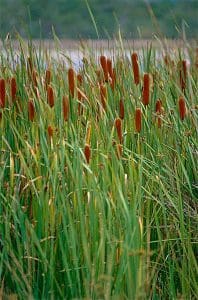
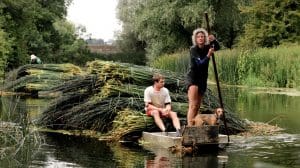
English rush weavers weave chair seats, mats and baskets from Bullrushes.
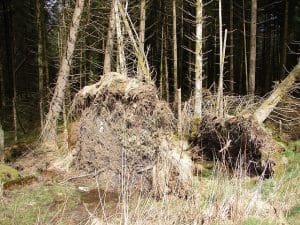
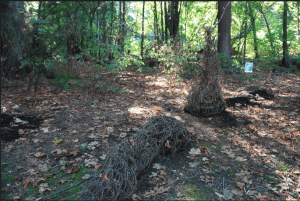
After a storm destroyed a nearby forest Canadian artist Sharon Kallis wove an Ivy ‘nurse log’ for new plants to propagate.
If you want to get in on the wild weaving action why not have a go at making yourself an Ivy foraging basket? Ivy makes a fantastic weaving material: it grows in abundance in the wild so there is no need to cultivate it, it is very supple and easy to work with and the stems are strong and create hard-wearing baskets.
I’ve sought guidance for this ‘how-to guide’ from a piece written by the amazing Suzie Greives. Suzie writes wild weaving guides and sells her work on her Foraged Fibres website. Suzie also posts beautiful examples of her work on instagram – be sure to give her a follow for inspiration!
What materials you’ll need for wild weaving an ivy basket
- 30-40 long ivy vines, you will need more if they are shorter.
- 2 similar sized pre-prepared hoops made of long and bendy branchy material
- 6-10 ribs made of bendy branchy material.
- Seceteurs
- A big bucket or bath tub
- Some little clips.. Not completely necessary but really handy!
- A bucket
- A towel
About your materials:
Ivy Vines
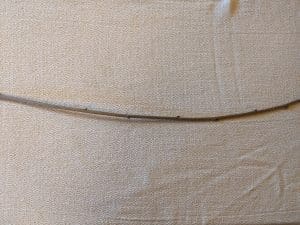
The 30-40 Ivy vines will be woven into the body of your basket.
When to gather Ivy
You can gather Ivy at any time of year, though it is best avoided during September and November when the pollen and flowers provide an important food-source for wildlife.
If you want to experiment with stripping the bark from your ivy vines prior to weaving to create an ivory coloured basket you should harvest your ivy in the summer when the sap flows between the bark and the inner wood making it very easy to slip bark off vines.
Where to gather Ivy
The best place for gathering ivy is along stone walls. Often you’ll find long stretches covered with vines which tends to be removed every few years by the council as ivy can cause structural damage so make sure you get there before the council do and put the vines to good use!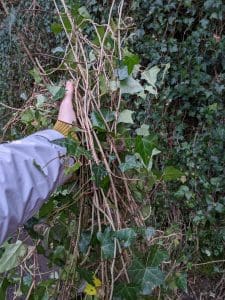
If you can’t find ivy growing on walls then vines dangling from trees can be great for weaving too. Take care as ivy likes to grow on dead branches and its easy to pull them down onto your head when collecting the vines!
Your vines should not be pulled from tree trunks as this can damage the tree and the vines which grow on trees are very wiggly and gnarled.
Ivy also sometimes likes to grow low to the ground, weaving over and under the soil. When it is growing in this way its needs a lot of post-harvest cleaning and gathering these vines will also disturb the soil so best find some others if possible!
How to gather for Wild Weaving
Once you’ve found a good patch of ivy, search for long and un-branched vines that are free hanging from the wall or tree. Some vines will just snap off if you pull them and for others you may need your secateurs.
It’s great to collect a range of different sized vines as they will be useful for different parts of the basket. Really thick gnarly vines can even be used to add characterful frames and handles.
Once you’ve gathered a good amount of vines you will need to remove the leaves. Some people are sensitive to Ivy leaves and choose to wear gloves for this part of the process. To remove the leaves, run the vine through your hands, allowing the leaves, rootlets and little side branches to easily snap away from the main vine. If a few remain on the vines that’s fine, they can be woven into the basket and look pretty!
You can then coil the vines up into similar sized hoops taking care not kink them. Use a straggly vine to bind them all together and carry them home. When we come to weave we’re going to put these coils in a bucket to soak so don’t make your coils any bigger than your bucket!
Drying/Storing your Ivy
Once you have brought your beautiful Ivy harvest back home, you want to hang your coils up somewhere airy, warm and dry.
You can run a piece of string through the middle of small bundles of coils and hang in bunches above head-bashing height.
After two to four weeks your vines should be nice and dry and ready to prepare for weaving but don’t feel you need to use them straight away, they can be used at least a year after harvesting.
Let’s start Wild Weaving
The process might seem quite long but it’s just a set of repeating steps to follow over and again, once you’ve done one basket you’ll have nailed it and be ready to start your second.
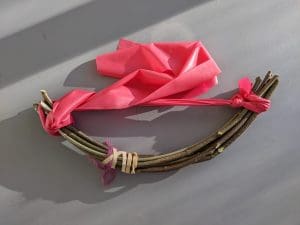
Hoops and Ribs
2 Hoops
6-10 Ribs
Hoops and ribs are the bones of your basket. They can be made from long and bendy branchy material and will form the skeleton of the basket which the ivy is woven through.
I used hazel to make my hoops but you can use what is available for you.
Here is a list of species which could also be used:
Willow, Sycamore, Hazel, Poplar/Aspen, Apple/pear/plum etc. Holly, Ash, Rose, Eucalyptus, Snowberry, Linden, Dogwood
If you are foraging for your basket materials in winter this guide can help you identify leafless trees. But think Brambles, Honeysuckle, Clematis, Ivy, Jasmine
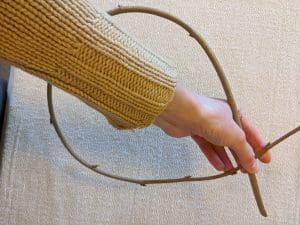
Make two evenly sized hoop by bending your pole into a circle and weaving the ends over and under until they hold their shape. Trim off the ends.
To make the ribs, find a way to keep the branches in a U shape whilst drying, I found that an exercise resistance band worked really well! Once dry they will be set to this shape.
The Ivy Basket weaving instructions
The Soaking process
The night before you want to use your vines place them delicately into a bucket and fill with warm water. It’s really important when they’re dry to be as gentle as possible. If you roughly shove them into the bucket you’ll find that when you come to weaving the next day they’ll snap easily.
As the vines are hollow once dried they will rise in the water so put either a lid or submerge a towel on top to keep the vines submersed.
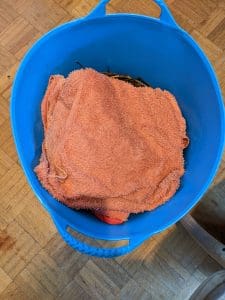
In the morning you’ll need to take the Ivy out of the water and let it rest for an hour or two in a damp towel. The thickness of vines, temperature, water type etc. play a part in how long your vines will need to be soaked. If they don’t quite feel flexible enough just keep checking until they do.
(The water used for soaking the vines also makes a great detergent as the ivy contains a high amount of saponins! )
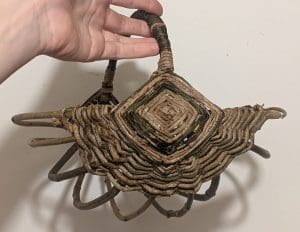
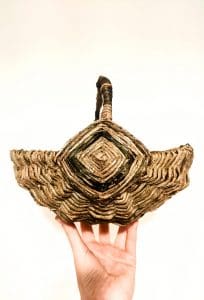
Making the frame
Now the ivy is prepared we need to make our frame. Take your two pre-prepared similar sized hoops and decide which you think is most beautiful! One will end up completely covered and one will be your handle, so think about how you want your basket be.
You may want a basket with a sculptural wavy handle to sit and look beautiful on your counter, or you might want a strong and sturdy practical basket that will accompany you on many a foraging adventure.
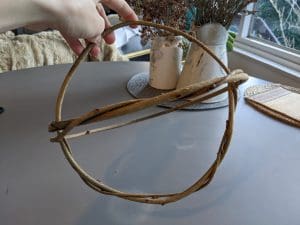
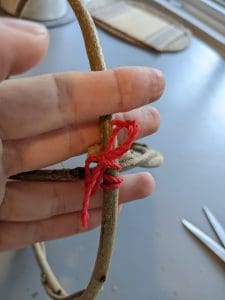
Once you’ve chosen the hoops interlock them in a frame with the hoop you would like as the handle on the outside. Make sure you’re happy with the shape and the two hoops are crossing roughly at mid-point then secure the cross sections with a handy piece of twine.
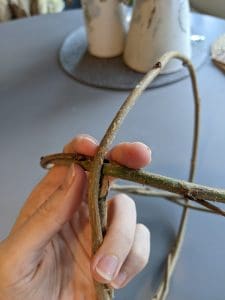
Weaving the god’s eye
To begin the god’s eye, the lashing that holds the hoops together, we first need to remove the twine from one side of your basket frame then take a nice long piece of ivy and lash the hoops together with the thinnest end of the Ivy vine.
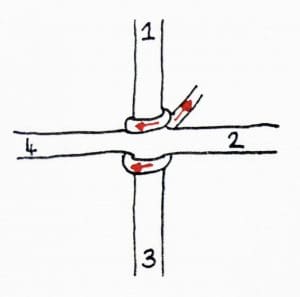
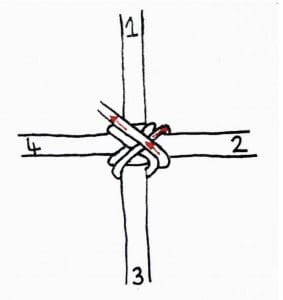
Looking straight on towards your basket so it appears like a cross the top of the cross is number 1 and the rest are numbered in a clockwise direction 2, 3 and 4.
1. The way that I found worked the best was to place the end of the ivy across the centre of the interior part of the cross, then wrap it over stem 1 and lead the ivy back down over the interior part of the cross and then out and over stem 3 and then back up the interior of part of the cross and between stem 1 and 2, covering the loose end and binding it in place in the process. If it’s easier for you you can also wrap it around each diagonal a couple of times instead. The aim is to bind the vine to cross.
Then we start the repetitive weave that makes the beautiful pattern of the god’s eye.
Take your vine left, underneath the 4th arm, then back over the top of itself so that it lands between the 2nd and the 3rd arm of the cross.
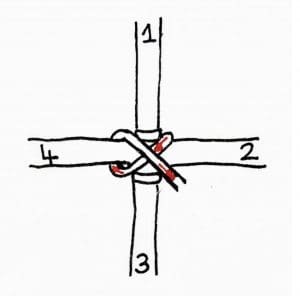
Repeat the same process as before from the vines new position. Going left under the 3rd arm then back over itself so that it lands between arms 1 and 2.
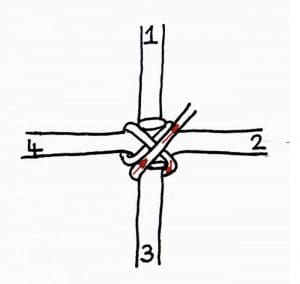
We repeat the same movement from this position. Taking your Ivy vine under the 2nd arm then bring it back over the top so that it lands between 4 and 1.
Now take your vine under the 1st arm, across the middle to land between 3 and 4.
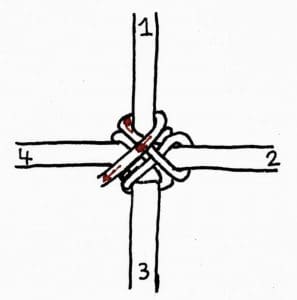
Now take your vine under the 4th arm, across the middle to land between 2 and 3.
If you use up your vine simply lay a new vine next to it and weave both together for a round or a couple of rounds and then continue weaving with the new vine. You can snip any ends as you go to keep your weaving tidy.
Keep going ! After you have gone round a few times you really get into the rhythm of it and stop thinking about numbers so much. The lovely pattern should start to emerge after three or four rounds
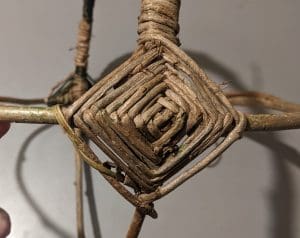
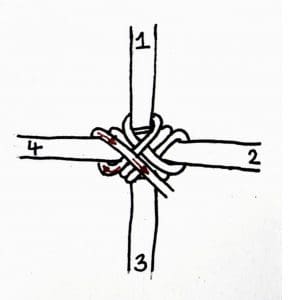
Once the god’s eye is the size you would like, tuck the free end in at the next juncture and pull tight. Just making sure not to tuck it in where the handle is. It need to be big enough to tuck your ribs behind it.
Once you have woven your god’s eye you need to gather your ribs your ribs.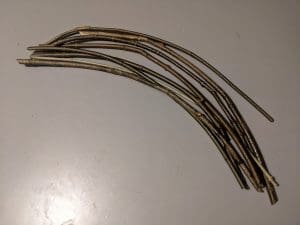
Place two or three ribs on either side of the inside of the god’s eye, running from one side of the basket to the other. The ribs need to be pre curved enough so that they don’t snap when putting them into place or bend the basket out of shape but they shouldn’t be too curved as it is important that the tension holds them in place.
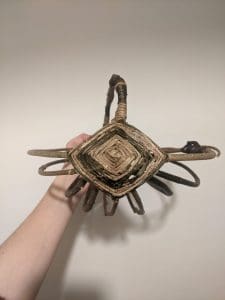
The two ribs closest to the middle should be slightly higher than the hoop running in between so that when it is standing on a surface there will be two points of balance.
Don’t worry if you can only fit in one or two ribs on each side. It’s easy to add ribs as we go along with the weaving when the gaps between the ribs become larger.
I decided to wrap the handle with ivy too as I liked the way it looked but this step is optional!
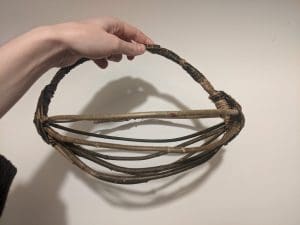
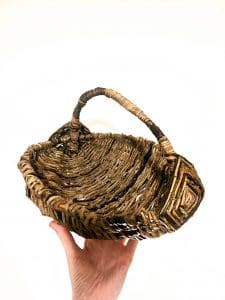
Weaving the basket
Now for the weaving! Choose a few of your thinnest vines to begin with.
Place the end of the vine behind one side of your hoop and start weaving your way from one side of the basket to the other. Over one, under one, over one, under one trying to keep the weave as tight as possible and as close to the god’s eye as you can.
This first part is super tricky as until you have done a couple of rows, the weaver will try to push the ribs out of place. Makes sure the weaver is bending around the ribs and not just pushing them out of place! This is why it’s very important to use very thin pliable Ivy.
Repeat this on the other side of your basket then start weaving your way towards the centre. Alternating between both sides
To add in a new weaver just lay the new weaver alongside the old weaver and carry on with the new vine.
Whilst continuing your over, under, over, under.. Be mindful of a few things:
Keep your weave as tight as possible whilst going along, you don’t want a gappy basket and it’s quite hard to remedy this once it’s already woven.
Keep an eye on the pattern, it’s easy to skip a rib. If you’re following the track of the previous row then something’s gone wrong and you need to retrace your steps!
Sometimes the ribs will wander into a different position. If you see this starting to happen just start to gently bend them back to where you want them.
Adding New Ribs
If you didn’t start with many ribs at the beginning you will notice at some point the weaving will start to become loose.
When this happens it’s time to add a new pair or couple of pairs of ribs.
To do this, cut the end of new rib at an angle, to make it easier to slide in, then push it in alongside an already existing rib as far as you comfortably can.
Then insert the other end in the other side making sure its inline with the other ribs i.e not lower of higher than the ribs either side of it.
Once you’re happy with the position of your new ribs resume weaving. Putting gentle pressure to separate out the ribs whilst weaving around them so the don’t stay bunched up together. As both sides get tighter it becomes more and more tricky to weave what with the gaps getting smaller.
You may also notice that for some reason one area is further behind than the other. If this is the case instead of weaving from one side of the hoop to the other, you can fill in the gaps by weaving back and fourth in the area that’s lacking. If it’s the area next to the hoop that’s behind you can remedy that by making a double loop when you reach the edge and that side should soon catch up.
When you are finished weaving take your secateurs and trim off the excess Ivy danglers flush with the basket.
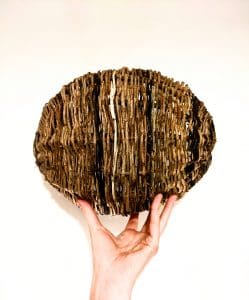
Last step is to admire your beautiful wild basket in all its beautiful wavy wonkiness. Remember, nature is not straight and boring, so why should your basket be!
You may notice a single white vine down the centre of my basket. I did this by splitting a vine down the middle using a knife and then gently easing the sides apart. As I gathered my ivy during winter it was not possible to make more split vines as the vines are not supple enough to split at this time of year. If you want to weave with split vines you should harvest them in spring when their sap is really flowing as this makes the splitting process much easier! There are some great YouTube videos on how to split Ivy if you’d like to have a go. The bark also comes off more easily in spring too if you want to have a go making a peeled ivy vine basket.
Enjoy!
References
https://www.buymeacoffee.com/foragedfibres/ivy-frame-basket-tutorial
https://www.buymeacoffee.com/foragedfibres/ivy-hedera-helix
https://www.rushmatters.co.uk/rush-harvesting
Scheuing, R. 2010. ”Urban Textiles. Textiles: From Yarn Bombing to Crochet Ivy Chains’ Capilano College, USA.
https://sharonkallis.wordpress.com/
https://www.google.com/search?q=splitting+ivy&rlz=1C5CHFA_enGB801GB801&oq=splitting+ivy&aqs=chrome..69i57j0i512j0i22i30j46i10i15i22i30j0i390i512i650l2.3303j0j4&sourceid=chrome&ie=UTF-8#fpstate=ive&vld=cid:7ac31c2e,vid:VEaJkEN_oX4,st:0//https://www.youtube.com/watch?v=–_RAuxeG9w