

This Bilberry Jam Recipe is a great way to use up a seasonal special glut of bilberries, they’re only in season for a couple of weeks and this is the best way I’ve found of preserving them, without destroying our freezer, for use throughout the rest of the year.
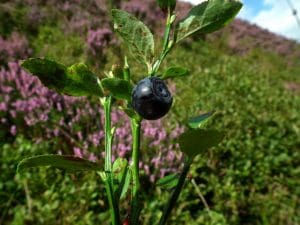
Known for their rich, deep purple colour and slightly tart flavour, bilberries are often mistaken for their close relatives, blueberries. However, bilberries are smaller, more intense in flavour, and have a shorter growing season, making them a rare and special treat. If you’re lucky enough to come across these little berries during their short season, usually from late July to early August, this Bilberry Jam recipe will allow you to preserve their unique flavour for the months to come.
Bilberries are often found growing wild in heaths, moorlands, and forest clearings, particularly in Europe and parts of the UK.
Foraging for bilberries can be a delightful way to spend a summer afternoon, but be prepared for a bit of a treasure hunt, as these berries grow low to the ground and can be hidden beneath leaves. It’s worth the effort, though, as the reward is a small but intensely flavoured fruit that turns into the most delicious jam in this delightful bilberry jam recipe.
The Magic of Bilberry Jam
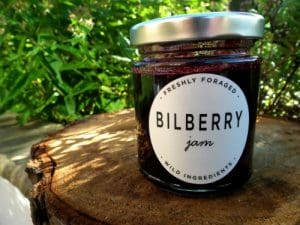
I find making my own jam is a deeply satisfying process, especially when using foraged fruits like bilberries. Not only does it allow me to connect with nature by preserving the flavours of the season, but it also lets me control exactly what goes into your food—no preservatives, artificial flavours, or excess sugar. It also makes for a wonderful gift for friends and family.
One of the great things about bilberry jam is its versatility. While it’s perfect on a piece of buttered toast or a scone, you can also use it as a filling for cakes, tarts, or pastries. If you’re feeling creative, mix it with other ingredients to create a sauce for desserts, or even add it to savoury dishes like roasted game to add a hint of sweetness. I’ve even used it in making a version of a wild twist on hoisin sauce which was an incredible hit with my family!
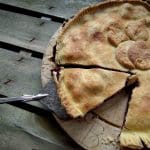
Another benefit of making bilberry jam is that it can serve as the base for more complex desserts, such as bilberry pie filling. By simply adding some diced cooking apples and warming it up in a pan, you can create a delicious pie filling that elevates the humble jam into a fancier dessert, perfect for special occasions.
If you’re new to making jam, don’t worry! This bilberry jam recipe is straightforward and doesn’t require any advanced techniques. With just three simple ingredients, you’ll be able to make a delicious, homemade jam that can last for up to a year if stored properly.
This is one of my favourite Jam Books I started learning with
Ingredients:
- 500g Bilberries
- 400g White Sugar
- Juice of 1 lemon
Method:
- Prepare the Bilberries
Start by giving the bilberries a good wash to remove any dirt or debris. If you’ve foraged them yourself, you may find that they’re relatively clean, especially if you’ve hand-picked them. However, if you’ve used a berry picker, you might need to spend a bit of time sorting through them to remove any hard stems, leaves, or unripe berries. Taking the time to do this will ensure a smoother texture in your final jam. - Cook the Ingredients
Place the cleaned bilberries, sugar, and lemon juice into a wide, heavy-bottomed pan. The wide pan helps the mixture heat evenly and prevents scorching. Gently heat the mixture, stirring occasionally to dissolve the sugar completely. The lemon juice acts as a natural pectin, which helps the jam set properly. As the sugar dissolves, the bilberries will release their vibrant purple juices, turning the mixture into a beautiful, deep-hued liquid. - Bring to a Boil
Once the sugar has fully dissolved, increase the heat and bring the mixture to a gentle rolling boil. This is the crucial stage where the magic happens, as the fruit, sugar, and lemon juice work together to create the perfect consistency for your jam. Continue to heat the mixture until it reaches the setting point, which is 105 degrees Celsius (220 degrees Fahrenheit). If you have a kitchen thermometer, this step is easy. However, if you don’t, you can use the “wrinkle test” to check if the jam is ready. Simply place a small plate in the fridge before you start cooking. When you think the jam is done, drop a small blob onto the cold plate. If it wrinkles when you push it with a spoon, the jam has reached the correct setting point. - Jar and Store
You’ve now followed our bilberry jam recipe to a T and it’s ready to be stored. Once your bilberry jam has reached the desired consistency, allow it to cool slightly. Pour the warm jam into sterilized jars, leaving a small gap at the top. Seal the jars with airtight lids, and allow them to cool completely. Properly stored, your homemade bilberry jam should keep for up to a year in a cool, dark place. Make sure to refrigerate the jam after opening.
Tips for the Best Homemade Jam
- Sterilize Your Jars: Proper sterilization is crucial to the success of your jam. To sterilize, wash your jars and lids in hot, soapy water, rinse well, and then place them in an oven at 140°C (284°F) for about 15 minutes. This will kill any bacteria or mould that could spoil your jam.
- Adjusting Sweetness: If you prefer your bilberry jam recipe less sweet, you can reduce the amount of sugar slightly. However, remember that sugar is a natural preservative, so reducing it too much may affect the shelf life of your jam.
- Experiment with Flavours: While this bilberry jam recipe is a classic, feel free to experiment by adding spices like cinnamon, or even a splash of port or red wine for a more complex flavour. You can also mix bilberries with other fruits like raspberries or blackberries for a unique twist.
This bilberry jam recipe is a fantastic way to preserve the taste of summer and bring it into your kitchen all year long. Whether you use it on toast, in desserts, or as a filling for pies, the rich flavour of bilberries will always shine through. So next time you come across a patch of wild bilberries, grab a basket and get foraging—your future self will thank you for it!
Find our Bilberry Recipes right here

Leave a Reply
You must be logged in to post a comment.