

Doesn’t just the very sound of Wild fermented fizzy drinks fill you with abandon?
No stacked corn syrup or artificial flavours here. Just fresh wild flavours straight from Mother Earth herself.
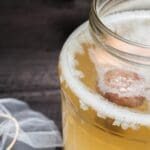
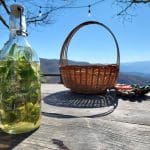
Wild fizzy drinks are made through a simple fermentation process. You simply make a juice or infusion, add yeast to it, leave it to ferment for a short time in some kind of container & then transfer it to a closed bottle. This is a probiotic process so the fermentation will continue within the closed bottle & as the pressure builds, this is what creates the carbonation.
It’s a simple process to make your wild fizzy drink & you can use all sorts of tasty foraged ingredients, but first you need a starter to ferment your brew. I’m giving you instructions here to make your own wild starter, but if you want to skip this step, you can use champagne yeast or baking yeast instead, but honestly, I don’t know that many folk who have supplies of champagne yeast in their store cupboard &, apparently, bakers’ yeast can taste a bit bready.
Wild Yeast Starters
Equipment:
Just a jar with a screw top lid, or else you can cover it with a double sheet of kitchen roll & pop an elastic band round it.
Wild yeast spores are literally all around us. The key, however, is getting enough wild spores into your brew to start fermentation.
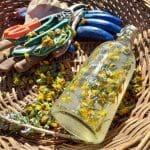
The best sources of wild yeasts are fruits & pollen laden blossoms, which are in abundance in late spring & summer. One of my favourite sources is immature Pine catkins & cones.
Other excellent sources of wild yeasts are wild flowers, raw honey, tree bark, (especially Birch & Aspen), Blueberries, Gooseberries, Raspberries, Brambles, (that’s Blackberries to the non Scottish contingent), Hops, Figs, Grapes, Apples, Plums, Cherries, Peaches…..you get the picture. If you want to use shop bought fruit, that’s fine but it must be organic & unwashed.
You can also use dried fruit, particularly figs, dates, raisins or sultanas. I have a sultana one on the go just now & will be collecting more pine catkins & cones this week. Other great sources for wild yeasts are Japanese Rose blossom, Sweet Cicely, (but if you collect these flowers, make sure they smell of aniseed so that you’re sure it’s not one of it’s toxic cousins like Hemlock), Hawthorn blossom, Rowan blossom, any of the Cherry blossoms & also Crab apples, Apple & Pear blossom.
The key thing to remember when collecting your blossoms, is that if you’re expecting to harvest fruit from the same trees later on in the year, don’t be surprised if there isn’t much as removing the blossom means there will inevitably be less fruit. This is why I love gathering Pine catkins as the lower branches provide plenty & the tree is always bursting further up out of reach, so I never worry about over harvesting.
Making your starter
- Make a sweet solution using 30% sugar & 70% spring water or tap water which has been allowed to stand overnight to allow the chlorine to evaporate out before using.
- Place the solution into your clean jar. Just a good wash out in hot soapy water should do it, no need for sterilising at this stage.
- Place your berries/fruit/yeast source, into the jar with the sugar solution. This needs to be around 20% or more of the volume of solution.
- Cover loosely with your lid or cloth. You need to allow fermentation gas to escape but prevent entry of unwanted bacteria or insects so if you are using a piece of cloth or kitchen paper, make sure it’s secured with an elastic band or string to prevent contamination.
- Stir the contents three or four times a day with a clean wooden spoon. After about 4 or 5 days you will notice that there is bubbling in your solution which means you have succeeded & your fermentation is active.
- Strain the plant material out of your starter, through a sieve lined with a piece of muslin/cheesecloth or a tight weave tea towel will do it.
Now all you need to do is use it to make your drink or you can make beer.
There are two basic procedures for making your fermented drink. One is the hot method & the other is a cold infusion. It really depends upon what your chosen wild ingredients are. Some ingredients will benefit from no heat, such as mint, all blossoms, soft fruits, young Pine tips, catkins, Spruce & Fir tips.
Dehydrated berries, Sage, Mugwort & Nettles are better boiled to extract the maximum flavour. Really, it’s up to you, but if you heat blossom you will immediately compromise the flavour & in some cases destroy it altogether. Likewise, with some greens, mint in particular. The best way for you to work this all out, is to experiment yourself.
The hot method involves boiling all your ingredients together first, allowing your mixture to cool & then, & only once it has cooled, do you add your wild yeast starter or dried yeast then leave to ferment for 12 to 24 hours before bottling. You don’t always have to boil your ingredients. Sometimes you can boil the water & sugar & then leave your herbs in the hot water to steep. As I said, you can experiment to see what tastes & works best for you.
Equipment:
- A funnel to pour your ferment into your bottles.
- Glass swing top or plastic drinks bottles, an old spring water bottle is perfect.
- A large jug or container that will hold around a 1.5 litres of liquid
- Either a large piece of muslin/cheesecloth or kitchen towel & an elastic band or twine to secure over the top of your container.
- A sieve & you can use the same piece of muslin/cheesecloth or kitchen towel to strain your ferment through.
- A large bowl or jug for straining your ferment into.
Ingredients:
- Your chosen plant material, enough to half fill your chosen vessel when loosely packed.
- 1 litre of spring water, or tap water that has been allowed to sit for at least 12 hours to allow the chlorine to evaporate out.
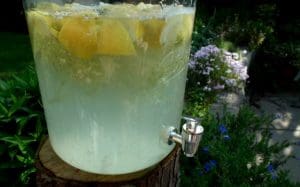
- 1 lemon/lime/orange/grapefruit, sliced.
- 60g of sugar. It really depends on your chosen plant material & personal preference here. I like to use white sugar for fresher flavours but brown, coconut, molasses all work equally well in feeding the yeast which is what we’re after to achieve a fermentation.
- 20mls of wild starter/1 teaspoon of bakers or champagne yeast.
- As with your wild starter, there is no need for sterilisation of bottles & equipment. Just a good wash in hot soapy water will be fine. You aren’t going to be storing your drink for long so it won’t actually have time to spoil.
Method:
- If using the hot method, place all of your ingredients, apart from your yeast or starter, into a pan, bring to the boil & then allow the mixture to cool completely. Follow the instructions below once cooled.
- Place all your plant material, washed & chopped, into your jug or container, to loosely fill to about half way. Add your sugar, sliced citrus fruit, water & starter/yeast. Give it a good stir with a clean wooden spoon, then cover with your cloth or paper. Stir three or four times daily with your clean wooden spoon.
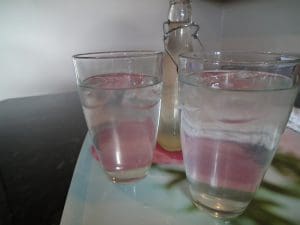
- After about 24 hours, maybe longer depending on your starter, the bubbling from the fermentation should be quite obvious. At this stage strain the plant material out of your ferment & decant into your glass or plastic bottle.
- Leave your bottled ferment out at room temperature for about 8 hours to allow the same rate of fermentation. It will continue to release C02 & you can check the pressure by opening the lid slightly if it’s glass, or giving it a squeeze if it’s plastic. Once you’re happy with it, refrigerate & enjoy. It will continue fermenting in the fridge, but the fermentation will have slowed down with the drop in the temperature.
I usually drink my ferment within 2 weeks of making it, sometimes quicker in summer.
Primitive Wild Fermented Drinks
Let’s do some debunking first of all. Making a primitive wild beer is very easy. Yes, honestly it really is. Beers have literally been made for thousands of years. Those early brews were made long before we Humans had any knowledge of bacteria or yeast or even hygiene.
If you head onto the internet to find out how to make your own beer at home, it will no doubt appear rather daunting, with endless lists of equipment & lots of terms which are completely unfamiliar, such as hydrometer, mash ph & specific gravity to name but a few!
Well, I have never used any of that equipment or worried about, (or even investigated), those unfamiliar terms. All the equipment you will need is already in your kitchen & the only ingredients you actually need are plants + water + sugar + yeast.
I’ve already covered how to make your own wild starter & that’s your yeast sorted. The plants you use are your own personal choice. I prefer to work seasonally so if it’s the middle of winter I will head out & look what Nature has left for me. This can include a selection of fallen leaves, (but if you do this make sure they are not toxic to humans), maybe some of the grasses which are still growing, possibly some Hawthorn berries which are usually about well into the winter, some tree bark & possibly some of my dried Mugwort & Nettle will go into the brew too. Obviously in Spring, Summer & Autumn we are spoilt for choice. I’m just giving you a different perspective on what you can forage here. We quite often head into the darker days of the year thinking that there isn’t much left out there to eat, but actually that’s not the case, plus if you’ve harvested plenty of greens to dehydrate & store you will have a great selection of wild foods to keep you going when we do have less choice.
Here is a list of some of the plants that have been used traditionally in beers (click the link on each to be taken to our foraging and identification guide for that species)
- Bog Myrtle
- Mugwort
- Nettle
- Dandelion
- Yarrow
- Birch
- Pine
- Oak
- Fir
- St Johns Wort
- Dock
- Mint
- Heather
- Lemonbalm
- Rosemary
- Sweet Cicely
- Elderflower & Elderberries, (not leaves)
This list is not exhaustive & really you can use whatever you fancy. I would just advise that you maybe make small batches to start with, in case you don’t like the resulting flavour.
Hygiene is extremely important when you are making fermented drinks. Hot soapy water, a good rinse & I like to use Milton sterilising tablets for my large containers & bottles which I’m going to re use.
I’m going to give the basic procedure here & then a couple of recipes, but you’ll notice a difference in quantities of plant material & this is down to the qualities of any given plant you choose to use. For example Mugwort has quite a bitter & highly aromatic flavour to it so less is needed, whereas Nettles have no bitterness to them & are far less aromatic, so more can be used. There are lots of recipes online & you can have a lot of fun creating your own brews.
Basic Procedure & Recipe For Making Wild Fermented Drinks & Beers
Ingredients & Equipment:
- Plants/ingredients as indicated in the recipe
- 4 litres of spring water or water tap water that has sat out for 24 hours to allow any chlorine to evaporate
- Brown sugar or whatever sugar specified in recipe
- Ale yeast sachet/wild yeast starter. Don’t use Bakers yeast for this or your beer will taste like bread. I would advise using an ale yeast until you get to grips with your wild yeast starters. It can be quite disheartening making a big batch of beer to then have no fermentation occur, (or stick to making small quantities to start with). I use 70mls of wild starter for this quantity.
- Large pan with a lid
- Some funnels, a small one & a larger one
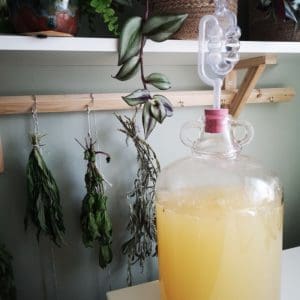
- A 4 litre bottle, container of some description. I use a 5 litre Kilner jar which was gifted to me by a friend who was “de-cluttering”. If you don’t have a jar or bottle of this size, scale down your ingredient quantities according to what you do have, until you are happy & know you will be making more brews in the future.
- Enough bottles for your brew to be decanted into
- Measuring spoon
- Weighing scales
- A small quantity of brown or white sugar
Method:
- Collect all your ingredients together & weigh according to your recipe.
- Place all your ingredients, (apart from your yeast & the extra sugar), into your pan & bring to the boil for however long your recipe asks you.
- Remove the pot from the heat & allow to cool to a lukewarm temperature. Keep the lid on your pan to prevent airborne bacteria or flies getting into your brew.
- Once cooled, strain out your plant material & using a funnel, pour the remaining liquid into your large jar/bottle.
- Add the yeast. You can add the yeast before you pour your liquid into your jar/bottle if it’s easier.
Because I use a Kilner jar, the seal allows any gas to be released but otherwise, you will need to regularly burp your jar/bottle to prevent any explosions. Alternatively you can cover with a double piece of kitchen towel or a muslin cloth. - Within 24 hours the fermentation should be active & you will see froth forming on top of the liquid.
- Allow the beer to ferment for the time stated in your recipe then, use a funnel to pour into your smaller bottles. Both the bottles & the funnel should be cleaned thoroughly before use.
- Fill the bottles to the base of the neck. When that’s complete, add ½ a teaspoon of white or brown sugar to each bottle. Close the tops, wait for 5 to 6 weeks & then you can enjoy your own wild beer.
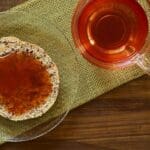
Mugwort-Lemon Beer Recipe
This is a really simple basic recipe. Mugwort is aromatic & bitter so is the perfect wild plant make a beer with.
Ingredients:
- 4 litres of spring water or tap water that has sat out for 24 hours to allow the chlorine to evaporate
- About 8g of dried Mugwort leaves
- 550g of dark brown sugar
- 3 large lemons
- Beer yeast or wild yeast
Method:
- Mix the water, Mugwort, & brown sugar in a large pan. Cut & squeeze the lemons into the pot. Bring the solution to a boil & let it boil for 30 minutes.
- Take the pan off the heat & allow the mixture to cool to around 20 degrees Celsius, (which is tepid). Once it’s cooled strain the plant material out & then add about a fifth of the sachet of yeast or ¾ of a cup of wild yeast starter.
- Transfer the brew into your jar or bottle & place your lid or cloth over the top. Leave to ferment for 10 days.
- Siphon the beer into bottles & pour half a teaspoon of brown sugar into the top of each bottle for carbonation.
- Close the bottles & store somewhere cool for about 7 weeks, although it will be ready after 4 weeks but the carbonation will be better if it’s left longer.
Nettle Beer Recipe
Ingredients:
- 4 litres of spring water or tap water left out at room temperature for 24 hours
- 450g of Nettles
- 28g of cream of tartar
- 450g of light brown sugar
- 3-4 lemons
- Beer yeast or wild starter
Method:
Follow the same method as for the Mugwort-Lemon Beer but leave to ferment for only 3 to 4 days in a warm place before bottling.
Drink after 7 to 10 days.
If, like me, you don’t really do that well with drinking alcohol, (in other words I get terrific hangovers from very little amounts of it!), you can make a much quicker, low alcohol beer by simply reducing the amount of sugar used by half & only fermenting for two weeks. This is also a good plan if you are in a hurry & want to give out home made bottles of beer as gifts, (which are usually very well received).
Conclusion on Wild Fermented Drinks
I’ve covered basic fermented drinks here, both alcoholic & non alcoholic. Making a wild starter is a really fun activity to do with children, especially when they can then use that wild starter to go on & make their own fizzy drinks. The beauty of this is, you can use your starter to make any fizzy drinks, the ingredients don’t have to be foraged, you can use any type of fruit from the supermarket & even frozen fruit works well too. That said, for me, you can’t beat going out & mindfully gathering a selection of wild ingredients to turn into a healthy bottle of fizz. Activities like these forge stronger connections to Nature & empower individuals to interact with their environment in a positive way, which of course, has to be good for all of us.
With all wild foods, please make sure that you are 100% sure of the identification & if you’re not sure, leave well alone.
Words by Forager Vicky – @thelittleforagerskitchen – Thanks Vicky 🙂
Fermentation is one of the oldest — and most magical — ways to preserve food and boost its flavour. From tangy krauts to fizzy foraged sodas, it’s a process that transforms simple ingredients into something alive, nourishing, and full of character. These recipes are all about slowing down, getting hands-on, and letting wild microbes do what they do best. Whether you’re new to fermenting or looking to try something a little different, there’s something here to spark your curiosity — and your taste buds.
If you’re hungry for more fermented recipes, click here to explore!